Uploading Image on Wikipedia Something Went Wrong
| | This help page needs to be updated. The reason given is: this manual may contain out of engagement information, examples or images. Please help update this aid page to reflect recent events or newly available information. Relevant give-and-take may be found on the talk page. (February 2020) |
One of the most hit features of Wikipedia articles is that about articles include at least one image. Editors accept added those images, one by i, and now an commodity without at least i illustration seems incomplete.
This chapter shows you how to upload an image for use in a Wikipedia article. Until you get an image off your reckoner and onto a server that Wikipedia uses, you tin can't use that image in an article. This affiliate also shows you how to place an paradigm in an commodity, afterwards yous or someone else has uploaded information technology.
Annotation:
In Wikipedia (and in this chapter), the discussion "epitome" doesn't just hateful a photograph; it can exist a map, a drawing, a chart, or even an animated gif. "Photo" refers only to an image taken by a camera.
Uploading images [edit]
When it comes to images, less is unremarkably more. A overabundance of images in an article may make it worse, not better. Don't overwhelm a medium-sized or small article by adding lots of images to information technology. Focus on uploading images that can support and illustrate the text of an commodity, not replace that text.
If you practice have a bunch of images that you could use for an article, but that you don't intend to use unless the article becomes much larger, you can still upload them. Instead of uploading them to the English Wikipedia (where every uploaded image needs to have a home in an commodity), you'll upload such images to the Wikimedia Commons, the identify where all the 250-plus unlike language Wikipedias can use information technology. In fact, this chapter recommends uploading all your images to Commons, whether you immediately put them into articles or not.
Wikimedia Commons holds uploaded media files similar photos, diagrams, animations, music, spoken text, video clips and PDFs. You lot can think of it as a stock media site for Wikipedia and other Wikimedia Foundation projects.
Tip:
Eatables is likewise a place where you tin can find millions of photos and other images for your personal use outside Wikipedia at no cost. All you demand to do is follow the licensing terms—for example, attributing a photograph to the person who took information technology, if y'all send the photo to someone else.
Before you upload [edit]
Earlier getting to the tutorial on uploading, you need to go through a short checklist. While this list talks about photos, a like policy applies to other types of images.
- Is the photo you desire to upload something you lot took and thus own? Is it in the public domain, or already licensed as costless content by its owner? If it's not any of the above, y'all can't upload information technology to Eatables. For details, see "Uploading a non-costless image".
Note:
A screenshot—a snapshot of a estimator screen—doesn't count as something you ain, even if you took it yourself. The image belongs to the owner of the software or other material you're capturing. It might be off-white use on Wikipedia, but it'south not gratis content, so it's not allowed in Commons.
- Are you lot willing to give up certain rights for a photo you took yourself, when y'all upload it? You must concur that, once y'all upload the photograph, anyone tin can use information technology for whatever purpose, including commercially, and you won't get paid. Basically, you must agree to license your photograph for use by anyone. All you lot can ask is that they attribute the photograph to you lot.
- Is the photo of acceptable quality? Is it a file type that Wikipedia tin can utilize? (Run across the box well-nigh image formats.)
- Exercise you have a user account at Commons? If not, get i as described in the adjacent section.
Once the reply to all four questions is "aye," you're ready to upload your paradigm, post-obit the steps in the department well-nigh uploading an image to Commons.
Adequate types of photos
Wikipedia and the Wikimedia Eatables aren't file-sharing storage sites. If y'all upload a photo, it must be of the quality and type that would be suitable in an encyclopedia. That means no tiny photos, no blurry photos, and no sets of 47 poses by your canis familiaris.
The recommended format for photos is JPEG. Other acceptable formats are SVG, PNG, JPEG, XCF (GIMP), SXD (OpenOffice.org ane.x), and (since March 2009) TIFF files.
Well-nigh images on Wikipedia are JPEGs, which is the default setting on most digital cameras.
Creating a user account at Commons [edit]
Images at Wikimedia Eatables are bachelor to all Wikipedias, not just the English one. Images at Eatables don't have to actually be used in an commodity. They are in that location because they could be used in an commodity. You tin can take useful photos, upload them, and come dorsum afterward to utilise them. Or non—they're still bachelor to every other editor at the different language Wikipedias.
To upload images to Eatables, you need to log in. Commons uses the same accounts equally Wikipedia. Hence, if you lot are already logged in to Wikipedia, to get started on Commons just go to https://commons.wikimedia.org/. You lot are logged in as soon every bit the page loads.
Notation:
Although y'all use the aforementioned username, password and electronic mail address across all Wikimedia Foundation wikis, the residual of your preferences are stored separately for each wiki. If you take set whatever other preferences in Wikipedia, you should probably go to Special:Preferences on Commons to gear up the aforementioned preferences at that place.
Equally with the English Wikipedia, you have the pick of creating user pages. If you accept an business relationship only for the purpose of uploading images, you probably won't want to carp. But if you practice want to, the process is exactly the same as at Wikipedia; Commons runs on the same MediaWiki software.
The standard setting in your user preferences at Commons is "E-mail service me when my user talk page is inverse" (Figure 15-one). Keep it turned on. That way, you don't have to log in periodically to bank check for notifications—for example, that there was a problem with an image you uploaded. Instead, you tin can just assume that no news in your email inbox is good news. If you use your watchlist on Commons, you might likewise want to plow on the "Eastward-mail me when a page on my watchlist is inverse" option.

Figure 15-one. The standard email settings in the "User contour" tab of your user account's preferences allow Commons contact you when something changes.
Quality counts
Ever upload the highest resolution version of your image, keeping inside Commons' 100MB limit. A loftier-resolution prototype makes it easier for other editors to ingather a photo, if needed. (Or, if you have the tools and fourth dimension, you can do then before uploading.) Plus, as computer screens keep to increase in size, viewing larger images is becoming more common. Don't worry about the space your photograph will have up in the article—that's controlled past displaying a smaller, thumbnail version and letting readers choose their preferred prototype sizes.
Images should exist free from baloney, watermarks, credits, and anything else that would hamper their costless use. If you create an image that contains text that you added, yous should besides upload a version without whatever text, so projects in other languages tin apply the paradigm.
For a number of specific suggestions nearly image quality, come across the page Wikipedia:How to improve image quality (shortcut: WP:HIIQ). You'll besides detect JPEG tips in a department of the guideline Wikipedia:Preparing images for upload (shortcut: WP:PIFU).
Uploading an image to Commons [edit]
One time y'all've gone through the checklist in the section about pre-upload checks to decide whether you can use an image in Wikipedia, and you've got your Commons user account, you're prepare to upload an paradigm.
These steps assume that y'all're uploading for the outset fourth dimension, and that it's a photo you lot took yourself. Afterward you lot take more than experience, you can skip to the upload class (meet the bottom of Figure 15-2). Here's the footstep-by-footstep procedure.
i. Once you've logged into your Commons account, click the "Upload file" link on the left side of the screen.
- It'southward the first link in the "participate" gear up of links. Y'all'll see the initial screen in the upload process (Figure xv-2).

Figure 15-2. The 2 critical components, for copyright purposes, are the source of an image, and the license for that image. When you first the upload process to Commons, the outset folio is concerned with the source. Which link you click determines which page you'll run across next, a page that either helps you lot figure out the source or moves you to the question of the license.
Tip:
That Flickr link is there because so many people post photos at Flickr and release them equally gratis content. That means you can re-create those photos to Commons.
2. Click the link on the line, "It is entirely my ain piece of work".
- The page you lot encounter has a number of sections at the meridian (steps i to iii, and "Other tips"). Y'all're welcome to read them, but it's also okay to start at the bottom of the folio (Figure 15-iii), where yous fill out the required information for the upload.
- For copyrights, but ii things count: the source and the license. You've already specified a source (you took the photo); next, you demand to specify the 2d. Figure 15-4 shows your choices.
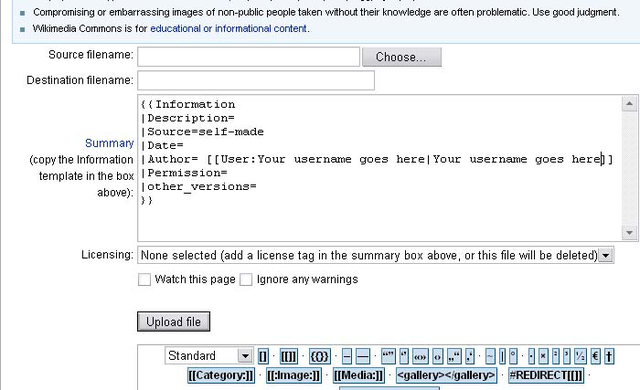
Figure 15-3. Here'southward what y'all need to fill up out in lodge to upload an image to Commons. The text in the Summary section is preloaded for you, including your user name.
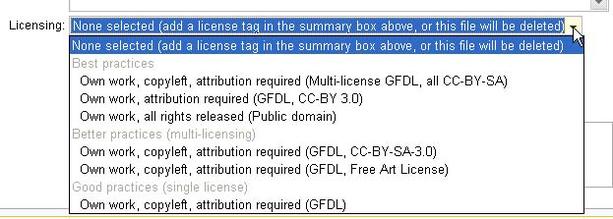
Figure xv-4. In one case you've specified that what you're uploading is your own piece of work, you have a pick of six different licenses. If y'all were uploading someone else'southward work (with their permission), y'all'd have a different selection of licenses. For your own work, the summit three licenses are categorized as "Best practices," the next 2 every bit "Meliorate practices (multi-licensing)," and the final 1 is in the category "Good practices (single license)." When you select one, you'll see more than information almost it.
three. Select "Own piece of work, all rights released (Public domain)."
- Whatever you selection, you'll see an caption immediately beneath the box with the license selection (Figure xv-five). This caption will also appear on the image page after completing the upload, and then anyone wanting to re-use your image knows the rules that apply. The license y'all cull doesn't affect the balance of the upload process.
- "Public domain" means that anyone tin can use the epitome however they like without restriction. If y'all want re-users of your image to aspect it to you, selection one of the other 5 options. If you're unsure about licensing, just click each ane and read the explanations.
- Notation that the available license options are different depending on what y'all selected at step 2. For your own work, you only run into the options that are relevant to your ain work.

Figure fifteen-v. When you lot select the public domain license, the page changes to show what the license actually is. If you determine you don't like what you encounter, you lot tin can cull another license. To become further information nearly the license you've tentatively selected, you lot can follow the links in the box that states what the license is.
Note:
You're doing what Wikipedia calls adding a copyright tag. For more information on these tags, including the vii licenses that image creators can cull from, run into the page Wikipedia:Image copyright tags (shortcut: WP:ICT).
4. Click the "Choose" button to the correct of the "Source filename" field.
- Upwards pops a file pick dialog box for you to navigate to the image on your estimator.
5. Double-click the file name.
- The text field displays the total path to the file on your computer. Figure 15-vi shows an example.

Figure 15-6. When you've selected a file, the "Source filename" field has the full path for that file. The destination filename is automatically given the aforementioned name as the source filename, simply you can change that.
6. Change the "Destination filename" from whatever was put automatically into the field (run across Effigy fifteen-vi) to something that describes the prototype.
7. The name y'all type becomes the name of the image page after you've finished uploading your photo. Make sure it ends with the right suffix, such equally ".jpg," to friction match the actual file type. (Run across the box about image types for what file types are acceptable, if you're not uploading a JPEG file.)
Warning:
Get the name right the kickoff time, because you can't rename an epitome file once it's been uploaded. If you don't go the name correct, you lot'll have to request an administrator to rename information technology for you. For more information, see the folio Commons:File renaming on Wikimedia Eatables (shortcut: COM:FR).
Getting the name right
Short or cryptic names for images brand them a lot harder to find and employ. If you employ a short name, or the default filename from your camera (like DSC123456.jpg), it's much more likely that someone else will later on upload an image with exactly the same name, and that will overwrite what y'all uploaded. Or, if you're uploading to Commons with the intent to add together an prototype to the English Wikipedia, you'll discover that an prototype file with the name you lot picked already exists on Wikipedia, so yous tin't use the one at Eatables.
The best image proper noun is a fairly long description. A bonus of using such a name is that you can re-create and paste it into the Clarification field for the paradigm, saving yourself some typing. (The maximum file name length is around 250 characters, but you won't demand a name that long.)
Finally, the image name you employ has to have a three-letter extension, such as .jpg or .svg. The extension must match the actual file type, or the photo won't brandish correctly. That makes paradigm pages different from regular pages (articles, talk pages, portals, categories, so on), which don't have a suffix. If you forget the extension, you're going to have to upload the photograph again. Lowercase extensions, such equally .jpg, are preferred over uppercase, like .JPG, though both work. Note that Eatables (and other MediaWiki websites) considers them two totally different files.
viii. Next is the large Summary field, which has already been partially filled out to bespeak what is needed. You lot simply add information to 2 parts. The information yous enter here volition announced on the prototype folio.
- For Description, copy what you put into the Destination filename field, since that should have been descriptive, and so elaborate on that a bit, if yous want to. You're creating some searchable text here, so don't be reluctant to go into detail. For instance, if the photo was taken from another building, or if there is something unusual in the photo, mention that in the clarification.
- For Appointment, blazon the date the photo was actually taken. (The Permission information is for licensing; since you've selected a license using the pull-downward menu, leave this field blank.)
- At this point, the page should look something like Figure 15-7.

Figure xv-7. Upload information is consummate, with a descriptive filename, and the Summary field filled out. Leave the Permission parameter blank, since y'all specified a license using the pull-down menu in the Licensing box.
Attribution and the author field
If you chose a license that requires re-users of the image to requite attribution to its creator, then the Writer field is important: it tells people who they should credit for the paradigm. For your ain work, Author is already filled in with your user name, so yous don't demand to modify it. If someone else has given you permission to upload their work, y'all'll need to put their name hither instead.
9. Below the licensing information (coil downwardly every bit needed) you lot'll come across the "Upload file" button. Click that.
- You'll see something like Figure fifteen-8.

Figure 15-8. After you click "Upload file," you'll go to the image page for the image y'all've just uploaded. This figure shows the peak and bottom of the folio; the prototype is in the middle. The information you lot entered in step 6 appears on this folio.
At this point, you're washed uploading. But it's very helpful to add together some categories to the photo, then others tin discover it more easily. To do so, come across the next section.
Uploading someone else'southward work
The procedure of uploading someone else's work (with their permission, of course) is like to uploading your ain piece of work. There is 1 important extra footstep, though: After uploading, y'all must electronic mail a argument to Wikimedia Eatables from the prototype's author, where the writer states the license they desire to use. Though yous selected the license during the upload, for legal reasons Wikimedia need a message from the paradigm'southward creator to confirm the license.
For data on this procedure, see the page Commons:OTRS on Wikimedia Commons.
Calculation categories to an image page at Eatables [edit]
At Eatables, you can add categories to an paradigm page to assist other editors find the page (for example, for a dissimilar language Wikipedia). These steps proceed with the aforementioned image from the previous tutorial:
1. Click the "find categories" tab at the peak of the paradigm page.
- You get in at a folio labeled CommonSense, which is a search tool. Information technology's preloaded with the prototype page name, and information technology's already washed an initial search on that proper name. That initial search failed. So yous'll want to enter some keywords, as shown in Figure 15-9.

Figure fifteen-9. The CommonSense tool searches for possible categories. If the initial search fails to find whatsoever (as is the case here), try adding keywords and searching once more. The results announced at the bottom of the page.
2. With keywords entered, click the Find Categories push button.
- The search results announced at the bottom of the page, with text set up to be copied and pasted into an image folio to the right of the categories, at the bottom. (Figure 15-ten.)
- After expanding categories as needed, and looking for the most applicable subcategories, y'all're set up to add categories. (For more on finding expert categories, come across the section about finding categories.)

Figure 15-x. The search results, at the bottom of the CommonSense folio, consist of ii parts. On the left are categories that tin be expanded (for looking at subcategories) by clicking the "[+]" symbol. On the correct is some text that's prepare to be copied and pasted to the image page.
3. Back at the epitome folio (Figure 15-8), click the "edit" tab, whorl down to the bottom of the page, and copy or type the category or categories y'all've decided fit the photograph.
- See Figure xv-11 for an example.

Effigy 15-11. Two categories are beingness added to the wikitext for the paradigm page: Entrance to the Noilly Pratt cellars and tasting room in Marseillan.jpg. The edit toolbar—the row of icons you tin can click to add text—is unlike in Commons. That's because the toolbar is customizable on a project-by-project basis. So, for example, the toolbar for the Spanish Wikipedia is different too.
4. Once you've entered the category you lot want, add an edit summary, like Calculation categories.
v. Click the "Show preview" button.
- Go downward to the very bottom of the screen to make sure all the category links are bluish, non red (if whatever are red, you mistyped something).
6. When all looks well, click the "Publish changes" push to brand your change accept consequence.
Renaming, replacing, or moving an image [edit]
Renaming an image [edit]
Simply Commons administrators can change the name of an image page. If y'all get it wrong—for example, you forgot the extension (like ".jpg"), or you used a not-descriptive name that already existed on Wikipedia (blocking you from using the image you uploaded to Eatables)—then you need to request that the file be renamed.
Images on Commons tin can be freely reused by anyone, including websites non owned past Wikimedia. Hence, renaming an epitome that has been effectually for a while tin interruption links on other websites, equally well equally on Wikipedia and its sis projects. Because of this, images tin can only be renamed for one of the few reasons listed in the Eatables:File renaming guideline (shortcut: COM:FR). Renames requested by the person who uploaded the file are allowed by this guideline, only read through the other reasons in the guideline if you desire an image uploaded by someone else to be renamed.
Once you've checked that your rename is for an immune reason, you lot can turn to the next step: nominating the image to be renamed. Here's the process:
- Edit the image folio, calculation the following template at the summit of the edit box:
{{rename|newname.ext|reason}}, where newname.ext is the new proper name yous desire for the image, and reason explains why you desire it renamed. - Add an edit summary, being sure to mention "rename" and a summary of your reason for the rename. For example, yous could enter "Asking rename to something more meaningful" if you are renaming a file that previously had a default meaningless name like "DSC_1234.jpg".
-
- Preview the page, and then save it.
- Your rename request volition appear in a message box below the paradigm on the paradigm page. The image itself isn't shown when previewing however, then the rename message box will exist at the top on the preview.
In one case you lot consummate these steps, you're done. Bank check dorsum in a twenty-four hour period or so, to see if the paradigm has been renamed. If non, check the talk page and the page history to see if the editor who declined the asking gave a reason. They might also take put an explanation on your own talk page.
Replacing an image [edit]
If you lot want to replace an image (you lot just found another photograph of the aforementioned thing that'south much better than the one you uploaded, for case), but upload it with the same name every bit the original paradigm. The system asks if you're certain you lot want to overwrite the former epitome; ostend that y'all practice.
Note:
The ability to upload a new image on elevation of an sometime one is restricted a bit: yous have to wait until iv days after creating an account at Commons earlier you can do then.
Moving an image from Wikipedia to Eatables [edit]
There's no automatic way to move an image from Wikipedia to Eatables. The standard mode is to download the image to your calculator (often correct-clicking the image gives you this choice), and so upload it to Commons. This procedure gives you a take chances to give the image a better (longer, more descriptive) proper noun. If you do alter the name, call back to change all links to that image in Wikipedia articles to bespeak to the new epitome at Commons, non to the former image.
Finding images [edit]
If you want an image for an article and aren't in a position to accept a photo to create that image, you have a number of options:
- Look through the more than two million images and other media files at Wikimedia Commons. Since Commons is but a repository for images for diverse Wikimedia Foundation projects, including Wikipedia, it's not surprising that its category organization is displayed on its master page.
- Search the Web, including Eatables, Flickr, and other language Wikipedias, using the Free Prototype Search Tool (FIST), at http://tools.wikimedia.de/~magnus/fist.php. This tool was specifically developed to look for free images for Wikipedia articles. Information technology besides lets you supersede non-free and placeholder images.
- Review the lists of places that have gratuitous or public domain images, to run across if 1 seems similar a good candidate for what you're looking for. See the pages Wikipedia:Gratuitous image resources (shortcut: WP:FIR) and Wikipedia:Public domain epitome resources (shortcut: WP:PDIR).
- Place a request for an prototype in the article itself. For details, see the page Wikipedia:Image placeholders (shortcut WP:UPPI). This method adds a generic image of a male or female person to the article.
- You can post a request at Wikipedia:Requested pictures (shortcut: WP:RP).
For fifty-fifty more than information, see the page Wikipedia:Finding images tutorial (shortcut: WP:FIT).
Placing an image in an article [edit]
One time you've uploaded an paradigm to Commons, calculation it to a Wikipedia article is very simple. You just go to the commodity, click "edit this folio," make up one's mind where you want the image to be, and type a link to the image folio. It'll look something similar this: [[File:Nameofimage.ext|some other optional stuff]]. (More on the "other optional stuff" in a moment.) Add an edit summary, do a quick preview, and save the page.
The software assumes that the paradigm name you add to an commodity refers to 1 at the English Wikipedia, if one exists there. If the English Wikipedia doesn't have an image with that proper noun, the software looks at Commons. That's some other good reason to proper noun an paradigm at Commons in such detail that it's unlikely you'll accidentally choose 1 that already exists at the English Wikipedia. (No, the software won't warn you.)
Note:
Forgot the name of that prototype that you uploaded to Eatables? Don't worry. Just sign in, click the "my contributions" link in the upper-right, and look at the names of the image files you've created. You tin do the same at the English language Wikipedia. Filter out everything except the images you accept uploaded by clicking the small "uploads" link just nether the page heading. Clicking this link likewise shows you thumbnails of the images y'all accept uploaded.
What about attribution?
Image licenses oft require that the writer of the image is attributed whenever the image is used. Though this is an important consideration for people that re-use the images outside of Wikipedia, yous don't demand to worry about this in articles. The software that runs Wikipedia automatically links an epitome to its image page, allowing whatsoever reader to click the image to encounter its author and license. This satisfies the attribution requirements of epitome licenses immune on Wikipedia.
Location [edit]
When there is more than 1 image in an article, spread the images evenly within that commodity. Each prototype should be relevant to the section information technology is in, and unremarkably at that place should exist only i image per department.
For accessibility and other reasons, you should put an image within the department it belongs to, subsequently whatever "Primary" or "See too" template at the pinnacle of the section. The more full general rule is to put an paradigm immediately above the paragraph of text to which it about closely belongs. Information technology'south certainly okay to have text following the epitome, within the section where it's placed.
Multiple images within a single department, while not forbidden, can cause problems, especially if the department is short. In item, don't place an image on the left side of a section and a 2d image directly reverse, on the right side. For some readers, this squeezes text into a tiny cavalcade between the 2 images. On some reckoner screens the images may fifty-fifty overlap. (Even if you know how to use special parameters in the image links to forcefulness bare space between the images to avert squeezing the text, don't exercise it. The bare text looks terrible on larger calculator screens.)
Note:
What y'all see on your screen isn't the same as what other readers see: Both screen sizes and resolutions (dots per inch) vary widely. Wikipedia is intended for readers everywhere in the earth, many who have older computers with smaller screens. So, if y'all've got a broad, high-resolution screen, enjoy it, but don't autumn into the trap of thinking that what looks fine on your screen will look fine on anybody else'south.
Some editors prefer to put all images on the right side of an commodity, aligned with any info boxes. Other editors prefer them to be evenly alternated between left and right (for instance, one image on the left in one department, and the side by side image, in a post-obit section, on the right). Either approach is acceptable, but don't become into buying issues over the arrangement of images—aesthetic judgments are inherently subjective, and non worth fighting about.
Note:
One place that's bad for an image is left-aligned immediately under a subheading. The heading ends up direct higher up the image (making information technology wait somewhat like a label) and puts the subsection text to the right of the image, disconnecting it from the heading. If you want an image left-aligned in a subsection, make sure there is at least a paragraph of text betwixt the prototype and the subheading. If you absolutely want the epitome to follow directly after a subsection heading, right-align it.
Yous control the alignment of images by typing instructions into the wikitext for the link. The next section tells all.
Size, alignment, and caption [edit]
In one case you decide in what department you want an epitome to appear, and where within that section, you but place a link to the image inside the wikitext. At its simplest, this would exist [[File:Nameofimage.ext]]. Merely you virtually never find such a simple image link in an commodity, because it plops the prototype, at full size, wherever the image link appears in the wikitext, even if that's in the centre of the screen. Nor, with this simple link, will text menses effectually the image. So don't create epitome links like this one, and if y'all meet one, fix it.
The manner that you control how an image appears is to specify various options. Here'due south a common specification: [[File:Nameofimage.ext | pollex | 200px | right | caption text]]. Hither's what the details of the options hateful:
- pollex. Displays the image as a small thumbnail. The image isn't shown full size (the reader can click the image to get to a full-size version). The image has a gray frame around it and a caption (if you specify one as described in the quaternary bullet).
Annotation:
These options are case-sensitive, so don't type Pollex, Right, and and then on.
- 200px. Determines the width of the thumbnail image in pixels. On a screen with 600 by 800 pixel resolution, 200px means that the photograph takes upwardly one-quarter of the width of the screen. If you lot don't specify a size, the default is 220 pixels (prior to April 2010, it was 180 pixels). Wikipedia:Extended prototype syntax (shortcut WP:EIS) recommends not specifying a size, so that the reader'due south preferences determine whether the displayed size is 180 pixels or something larger or smaller.
Tip:
If y'all've got a particularly big or particularly small screen, y'all can tell Wikipedia how you personally want to encounter thumbnails displayed on your screen. Click My Preferences, then the Files tab, and then select from i of the six sizes (120px to 300px). Afterward you click Save, all thumbnails you see in Wikipedia will exist that size, except where an editor has specified an exact size.
- correct, left. The paradigm appears all the way to the correct (left) of the screen. Correct is the default setting, so you don't have to type it if you don't want to.
- caption text. The explanation should provide useful information. In an article near New York City, for case, an image with the caption "New York Urban center" isn't helpful, while something similar "Panorama from the peak of the Empire State Building" is much more than useful. (Y'all'll detect cracking communication about writing captions at the guideline Wikipedia:Captions; the shortcut is WP:CAP.)
- Explanation text always comes final in an prototype link. All the other options (thumb or no, size, marshal right or left) can exist in any sequence. And the caption must start with a majuscule alphabetic character.
For more paradigm syntax, see the pages Help:Images and other uploaded files (shortcut: H:IOUF) and Wikipedia:Picture tutorial (shortcut: WP:PIC).
Galleries [edit]
In some articles, a lot of images are useful—for example, the article Neat Wall of Cathay. But yous don't desire to put images into sections where they don't really belong just because that's the only place you can think of. Instead, yous can put a gallery at the end of an article, with lots of images for the reader to encounter. That way, the images don't get in the way of the content of the article, but they're available to the reader.
The wikicode for creating a standard gallery is very elementary; hither's an instance with three images (and made-up prototype filenames):
<gallery> File:Firstphoto.jpg File:Secondphoto.jpg | Explanation for second paradigm File:Thirdphoto.jpg </gallery>
You tin have captions on all images, of class, and aren't limited to JPEG images. The page Wikipedia:Gallery tag (shortcut: WP:GALLERY) has total details.
Questions or problems with images [edit]
Sometimes you want to mention an prototype on an article talk page, or at a discussion page such as the Village Pump. If y'all type [[File:imagename.jpg]], y'all insert the image itself onto that talk page, non a link to the epitome folio, as you wanted. Displayed images don't belong on talk pages. To create a link to the prototype page instead, type a colon just after the first two square brackets, then the link looks like this: [[:File:imagename.jpg]]. Then those interested in actually seeing the image can click the link.
Tip:
Using a leading colon works also for links to category pages, when y'all want to point to them rather than actually add categories to a folio. It too works for links to Wikipedia in other languages, when you want the link to appear where you put it instead of in the "Languages" box on the left of the page.
If y'all find an prototype that you think has copyright issues, you should:
- Remove all links to the paradigm from manufactures, making sure your edit summary mentions copyright issues. (You tin can find all uses of the paradigm by going to the image page and clicking, in the left margin, "What links here.")
- Post a notation at the user talk folio of the editor who uploaded the image, mentioning your concerns. You may be able to resolve the consequence at that point.
- If the editor who uploaded the image disagrees with your cess, and you remain convinced there is a copyright problem, list the image at the page Wikipedia:Copyright problems (shortcut: WP:CP).
- If you get no response from the editor in a reasonable amount of time (say, a week), mail the {{ifd}} template on the paradigm page, relieve the change, and and so follow the link "How to listing a file for deletion" in society to list the file for deletion.
Uploading a not-free image [edit]
In March 2007, the Board of Trustees of the Wikimedia Foundation passed a policy (see https://wikimediafoundation.org/wiki/Resolution:Licensing_policy) banning futurity uploads of any media unless the media is licensed as free content. Costless content is any work that doesn't require permission or payment for whatever utilize, including commercial. At most, free content requires attribution: crediting the person who created the epitome. Free content likewise has no restrictions on redistribution of the image by others.
The Foundation'due south resolution allows exceptions only as provided past a projection-specific exemption policy. That policy for the English Wikipedia is Wikipedia:Non-gratis content criteria (shortcut: WP:NFCC). Information technology sets out a list of 10 criteria for copyrighted images and other media files that lack a costless content license (see Figure 15-12). You may use such media simply where all 10 of the criteria are met. Otherwise, as explained in the section about pre-upload checks, the images you upload must be your own work, or in the public domain, or licensed as gratis content by their owner.

Figure 15-12. Wikipedia doesn't like non-free content. It tin can exist used only if information technology meets every one of the x criteria in the policy Wikipedia:Not-free content criteria (shortcut: WP:NFCC). Nigh of all, notation number 8, which specifies that the non-free material must contribute significantly to agreement the article.
The Foundation's policy is especially strict almost images of living people: An exemption policy must not allow non-free textile when freely licensed pictures are readily available, as is almost e'er the case for celebrities, politicians, and other notable people.
Wikipedia takes copyright issues seriously. Almost every 24-hour interval, at least 1500 images are deleted (see Figure fifteen-thirteen). Some are deleted because they're orphans—Wikipedia isn't a file-sharing service. Some are deleted because the image was uploaded to Commons and now isn't needed at Wikipedia. Many, if non the bulk, accept copyright issues.

Figure 15-13. While image uploads have been relatively steady at effectually 2,500 per day throughout the concluding half of 2006 and well into 2007, deletions have been all over the place, ranging from 1,000 to 4,000 per day. The wide swings are probably due to occasional concentrated efforts to piece of work off backlogs. [This graph is courtesy of editor Dragons Flying (Robert A. Rohde). It's based on a log assay he did. Points on the graph are plotted weekly, not daily.]
The graph shows that outset in the 2nd one-half of 2007 there has been essentially no net addition of images to Wikipedia. In other words, every bit many photos are existence removed as added. That'southward certainly due to Commons: Either images are existence uploaded directly in that location, or images that were at Wikipedia are being uploaded to Commons and so deleted at Wikipedia.
Implementation of the Wikipedia policy on non-free content criteria is discussed in the guideline Wikipedia:Non-free content (shortcut: WP:NFC). If you're thinking about uploading a "fair use" epitome (one you lot didn't create, isn't in the public domain, and hasn't been released as free content by the owner), read this guideline showtime.
If after reading the guidelines yous have decided to upload the image, become to Wikipedia:Upload (shortcut:WP:UL) and follow the directions in that location. Before yous upload, make sure that i or more articles volition utilize your image. 1 way to ensure this is to start editing a page, add the image under the filename you will upload the paradigm under, then save as before long as the image is uploaded. If the image is removed from all articles, you lot volition shortly receive a observe from a bot alarm you about an "orphan non-free image." In that instance, re-add the image to the article and and then talk over the prototype on the article'due south talk folio.
Note:
Screenshots and similar image captures aren't the same as original photos. They're fair use images, if the original content (existence copied) isn't itself free content.
Non-photo images and other media
Every bit mentioned at the beginning of this affiliate, an image doesn't accept to be a photo. It could be a map, an illustration, a graphic, or even an animated gif. The SVG format is preferred for drawings and line-art illustration. The PNG format is preferred for not-vector graphic iconic images, including screenshots. The GIF format is used for animations, merely not for static images.
If you're interested in using these file types, hither are some places at Wikipedia that you tin go more than information:
Maps:
- Wikipedia:WikiProject Maps (shortcut: WP:WPMAP)
- Two pages at Meta: http://meta.wikimedia.org/wiki/Maps and http://meta.wikimedia.org/wiki/Wikimaps
Graphics and illustrations:
- Wikipedia:Graphics tutorials
- Wikipedia:Preparing images for upload (shortcut: WP:PIFU)
- Wikipedia:How to create graphs for Wikipedia articles
- Wikipedia:Graphic Lab
- Wikipedia:WikiProject Illustration
You can also upload other types of media too images: sound and video files. Because of licensing issues, the file formats acceptable for uploads are very limited:
- For audio: Ogg (using FLAC, Speex, or Vorbis codecs), WAV (PCM encoded), FLAC (without container) or MIDI (with extension
.mid). Ogg Vorbis for general awarding or FLAC for lossless sound encoding are preferred. - For video: Ogg (using Theora codec), WebM
If audio or video files involvement y'all, hither are some places at Wikipedia where yous tin can get further information:
- Wikipedia:Media
- Wikipedia:Media help (shortcut: WP:MH)
- Wikipedia:Free audio resource (shortcut: WP:FSR)
Source: https://en.wikipedia.org/wiki/Help:Wikipedia:_The_Missing_Manual/Formatting_and_illustrating_articles/Adding_images
0 Response to "Uploading Image on Wikipedia Something Went Wrong"
Enregistrer un commentaire